Pages define the structure of your web site, and to a large extent determine the functionality of your site. Every page has a page type, determined when the page is created.
This section tells you how to create and manage pages, including updating page content, managing page meta data, and managing draft versions of pages.
There are two ways you can create a new page. Firstly, you can click the from the pages tree view widget. This is used for creating a sub-page of the page that is currently selected in the tree.
Secondly, you can click the button when viewing the details of a page (in the page viewer widget).
Before you can create the new page, you must select which page type to use. The page type will determine which fields must be completed when creating the new page.
Some page types cannot be used within other page types. For example, if you have a page type that uses the calendar event details, then you cannot create a page of this type within another page of this type. Be aware of this if the page type you want to use for a new page does not appear to be available.
At minimum, you must fill the title and URL fields when creating a new page. The title field is used to identify the page within the Control Panel. Additionally, you can output this value on your web site if required.
The URL field is used to determine how your web site visitors access the page. This value is combined with all pages above the page to determine the URL.
The home page has a URL (without domain) of /. If the
home page has a child page with a URL value of products, then
the full URL for that page will be /products. Additionally,
if the products page has a sub-page with a URL value of
abc-product, then its full URL will be
/products/abc-product.
Most page types will require you to select a template to output the page on your site (some don't, such as when using an RSS feed page type. This type of page outputs code that is compatible with RSS feed readers). For details on creating a page template, refer to the Managing Templates chapter.
Once you have filled out all required fields, click the button. Once the page has been created it will appear in the pages tree view. You can now click on it in the tree to view the page details.
Once a page has been created you can edit its details by clicking on the button on the page viewer widget. This will open the page editor dialog, which is similar to the page creation dialog.
Once you have made the necessary changes click the button.
To delete a page, click the button when viewing the page details. This button is not available for the home page, since the home page cannot be deleted.
You will be prompted to confirm deletion of the page.
Deleting a page will also delete all pages that are contained within the page. This operation cannot be undone.
In addition to the custom fields that can be specified for page types, you can also add any additional custom data to a page as required. This is achieved using the tab when viewing a page.
This feature may not be available for certain page types.
When you load this tab a list of existing meta data values is shown (when you create a new page there won't yet be any).
To create a new meta value, click the button. You will now have to select the type of value you would like to add.
Once you have selected the value type you will be shown a dialog for creating the new value. Firstly, enter a title for the value. This is used to identify the meta value, and can be output on your web site if required.
Next, enter a name for the field. If this is left blank the name will be created using the title value. The name value is important as it is used to refer to the meta field from within page templates.
Finally, enter the value for the field. Once you have done so, click the to create the new value. The list of meta values for the page will then be updated.
To make changes to the meta value, click the link beside the value. Make any changes as required then click the button.
To delete a meta value, click the button beside the value you want to delete. You will be prompted to confirm that you want to delete the value.
Pages in Recite CMS can have any number of content blocks. You can manage content blocks by clicking on the tab when viewing a page's details.
The content blocks that are available for a page is dependent on the template
that is being used. In your template, using the {contentblock}
template tag specifies a content block.
You can have any number of content blocks on a page - if the template has none then you cannot manage content blocks for the page.
Each content block must have its own name, specified using the
name parameter. For example, you can use
{contentblock name='Right Column'} to add a content block
called Right Column.
Once the content blocks tab is loaded, you will see all of the available content blocks. There will be a preview displayed for each block, as well as an button above each preview.
Click this button to edit a content block. This will result in the Recite CMS WYSIWYG editor appearing in a dialog box. Refer to the WYSIWYG Editor Guide appendix for details on using this editor.
Once you have made required changes, click the button. This will save your changes and leave the WYSIWYG editor open. You can also click the button which will save the changes then close the WYSIWYG. Alternatively, you can click to discard any changes since you last saved.
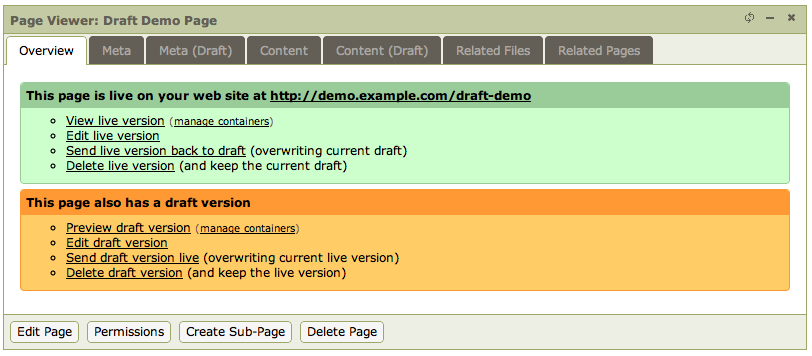
Recite CMS allows you to have a draft version of any page in your site. Each page can have either a live page, a draft page, or both. Visitors to your site can only see the live page.
Draft pages are useful because they allow you to change aspects of your site and preview those changes before you send them live.
If a page is in draft (and doesn't have a live version), then any pages within that page are also not accessible by your site visitors (regardless of the status of those sub-pages).
You can easily determine the status of a page by looking at the tab when viewing the page. If there is a live version of that page you will see a large green box indicating so; if there is a draft version you will see a large orange box.
There are two ways to create a draft page. The first way is to click in the content overview box. This will make a copy of the live page (including containers, content blocks and meta values), while keeping the live version in place.
The second way to create a draft is to click the link. As the name suggests, the page will no longer be live and will only be in draft.
Once you have created a draft, you can make changes to the page details, its content and its meta data. Additionally, if you load the draft page in container view you can manage container rules independently of the live page.
To edit the main page details, click in the draft status box. You can update all fields for the page except for its URL and its template (these are both managed by editing the live version of the page).
To manage meta data and content blocks for the draft version, use the relevant tab at the top of the page viewer. A new tab is created for managing draft content blocks and a new tab for managing draft meta data.
To manage container rules independently of the live page, click the link in the draft status box. When Recite CMS is in administration mode, the Recite CMS overlay will indicate whether or not you're managing the live or draft page.
For more details about managing container rules, refer to the Administration Mode chapter.
If you want to preview any changes you've made to the draft page without having to send it live, click the link in the draft status box.
Your web site will now load in a new window. It will load the page you are managing in draft mode. You can easily toggle between the live and draft versions.
Once you've finished creating your draft page you will want to send it live. You can do this by clicking on the button in the draft status box.
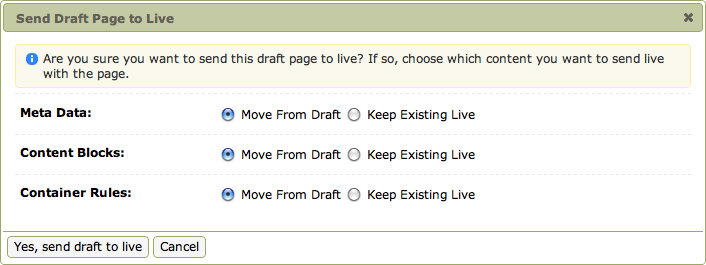
You will be prompted to confirm that you want to send the draft version live. If there is already a live version you will also need to confirm exactly which data you want to send live.
Sometimes you won't necessarily want to send all data live. For example, if you change the container rules of the live page after creating the draft page, the draft page will only have a copy of the old container rule set up. In this case, you may not want to copy the container rules from the draft page.
Click to confirm sending the draft page live.
If you want to change where in your site belongs, use the pages tree view widget. Click-drag the page to a new location in the tree. You can either drop it on a page to add it to the bottom of the section, or you can be more precise and drag it between two other pages.
Similar to moving pages to a new section, you can click-drag a page to a new location within its current section. When you click-drag a page you can see a line that indicates where in the tree it will belong if you drop it.
The page ordering is used for outputting a site map on your web site (using the Pages Site Map container rule). This is also commonly used for generating web site navigation.