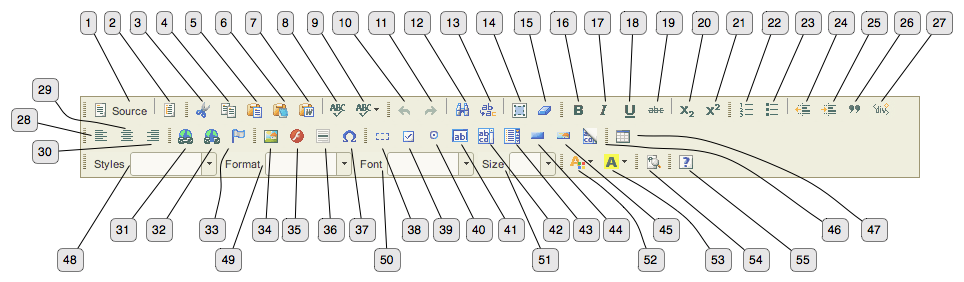
This section lists the function of all toolbar buttons in the WYSIWYG.
. Toggles between HTML source code view and point-and-click view. Using HTML source mode allows you to manually adjust the HTML code if required.
. This button opens a popup that lists pre-built templates that can be inserted into the editor. See the Templates section for help on creating templates.
. Remove the selection and add it to the clipboard so it can be pasted in elsewhere.
. Add the selection to the clipboard so it can be pasted elsewhere.
. Insert previously copied content where the cursor currently is.
. Insert previously copied content where the cursor currently is, stripping out any formatting.
. Insert content copied from Microsoft Word where the cursor currently is. This function removes extraneous markup generated by Word so it doesn't clutter up the HTML code on your page.
. Checks the spelling of your content.
. Allows you to enable real-time checking of the content as you type it.
. Undo the previous action you performed.
. Redo an action you just undid.
. Search for a string in your content.
. Search for a string in your content and replace it with a different string.
. Select all content. This is useful if you want to copy everything or clear the content.
. Turns the selection into plain text. For instance, if you have bold text, select the text and clicking this button will remove the bold formatting.
. If text is selected, this button will make it bold. If it's already bold then this formatting will be removed. If no text is selected then bold will be enabled (or disabled) for text you now type.
. If text is selected, this button will italicize it. If it's already in italics then this formatting will be removed. If no text is selected then italics will be enabled (or disabled) for text you now type.
. If text is selected, this button will underline it. If it's already underlined then this formatting will be removed. If no text is selected then underline will be enabled (or disabled) for text you now type.
. If text is selected, this button will add a line through the text. If it's struck-out then this formatting will be removed. If no text is selected then strikout will be enabled (or disabled) for text you now type.
. If text is selected, this button will make it subscript (below the line). If it's already subscript then this formatting will be removed. If no text is selected the subscript will be enabled (or disabled) for text you now type.
. If text is selected, this button will make it superscript (above the line). If it's already superscript then this formatting will be removed. If no text is selected the superscript will be enabled (or disabled) for text you now type.
. This button inserts a numbered list where the cursor is. If you have several paragraphs selected it will turn them into a numbered list.
. This button inserts a bulleted list where the cursor is. If you have several paragraphs selected it will turn them into a bulleted list.
. This button decreases the indent (left margin) of the current paragraph(s).
. This button increases the indent (left margin) of the current paragraph(s).
. This button adds a margin to the left and right of the current paragraph(s).
. This button is used for inserting a HTML DIV element.
. Makes the current paragraph(s) left aligned.
. Makes the current paragraph(s) centered.
. Makes the current paragraph(s) right aligned.
. Turn the current selection into a link. This button will open a dialog with various options for creating the link. Click the button to find a file or page from your web site to link to. Refer to File Browser for more information.
. If the current selection is a hyperlink this removes the link.
. This inserts a marker at the current location that you can subsequently link to.
. Insert an image at the current location. This button opens a dialog with various options for inserting an image. Click the button to find an image on your web site. Refer to File Browser for more information.
. Insert an Adobe Flash move at the current location. This button opens a dialog with various options for inserting a Flash movie. Click to find a Flash movie to insert from your web site. Refer to File Browser for more information.
. Insert a horizontal line at the current location.
. This button will open a dialog with a list of special characters you can choose to insert at the current cursor location.
. Opens a dialog with various options for creating a form. Once you have created a form you can then insert form elements.
. Opens a dialog with options for inserting a checkbox in the current location.
. Opens a dialog with options for inserting a radio button in the current location.
. Opens a dialog with options for inserting a text input in the current location.
. Opens a dialog with options for inserting a text area input in the current location.
. Opens a dialog with options for inserting a drop-down select box in the current location.
. Opens a dialog for inserting a button (such as a form submit button) in the current location.
. Opens a dialog for inserting an image button in the current location. Click the button to find an image from your web site. Refer to File Browser for more information.
. Opens a dialog for inserting a hidden form value in the current location.
. This drop-down allows you to format the current selection using a pre-defined style. This list can be customized - refer to Customizing the WYSIWYG for more information.
. This drop-down allows you to format the current selection so it is a heading or otherwise.
. This drop-down allows you to change the font face of the current selection.
. This drop-down allows you to change the font size of the current selection.
. This drop-down allows you to change the text colour of the current selection.
. This drop-down allows you to change the background colour of the current selection.