Each template you create in Recite CMS serves a different purpose - one template might list calendar events for the current month, while another may display search results.
Typically a single page is made up of several templates - there will be a template which outputs the key elements of a HTML page, while within it there may be several container rules, each using a different template.
Refer to the Administration Mode chapter for details about Container Rules and how to manage them.
This section tells you how to manage templates within Recite CMS. Note however that this section's purpose is not to instruct you how to write templates. Refer to the Template Writing Guide appendix for details about how to write templates.
New templates are created by clicking the button on the template browser. When the new template is created it will be created in the folder that is active in the template browser when you click the button.
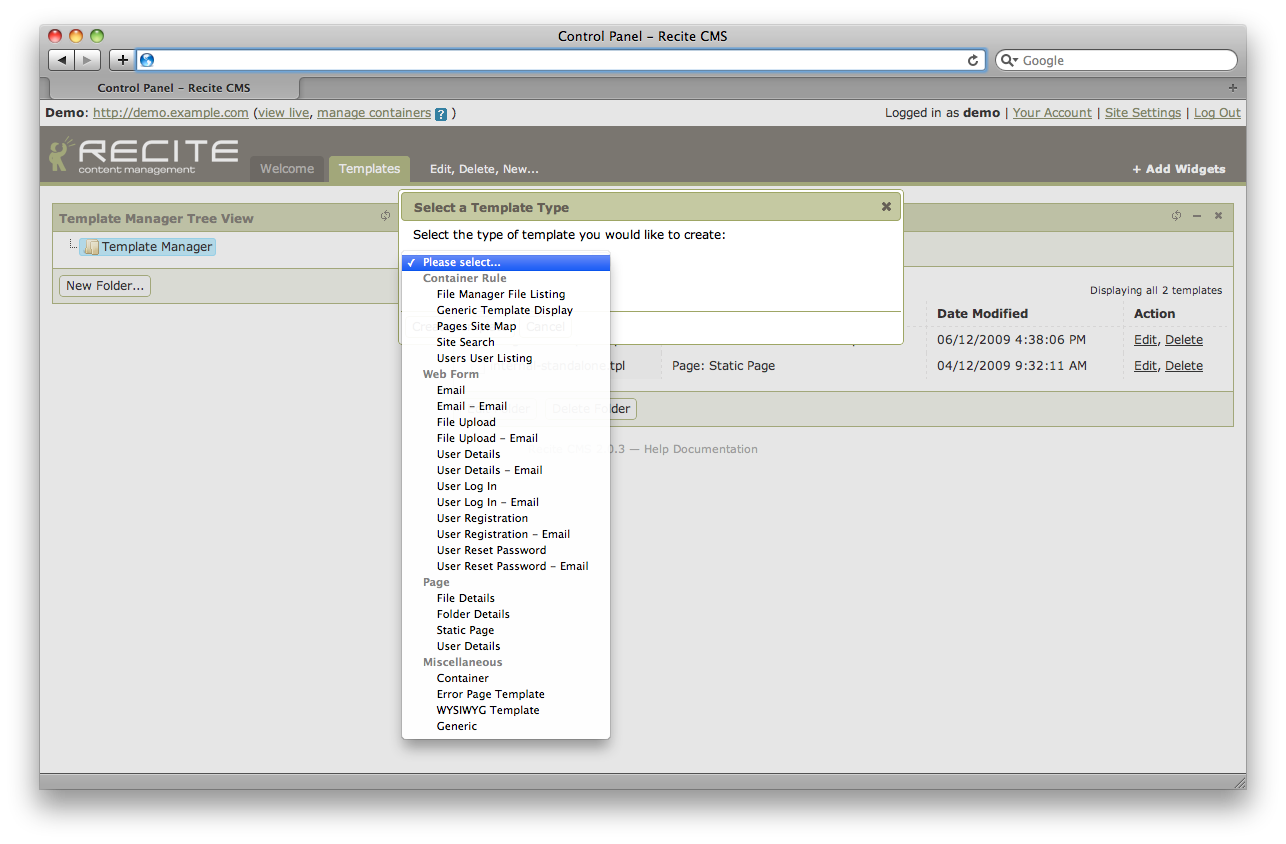
Clicking the button will result in dialog appearing, from which you must choose a template type. The type of template you choose will determine the data available in the template, as well as where the template can be used in your site.
The types of templates are split into various categories. For example, a template type that is used for rendering a container rule is under the Container Rule heading.
There is also a section for form template types. There are two different
template types for each form available in Recite CMS. One is for rendering the
form on the web site, while those ending in Email are used
for emails sent after the form is submitted. Refer to the Managing Forms chapter for more
details.
Once you have chosen a template type, click the button. This will result in the Template Editor widget being loaded.
You can then enter a name for the template in the File Path field. If you want to include this template from another template this is the name you use to refer to the template.
How you decide to name your templates is up to you, but regardless of how you
should name them consistently. As a guide, all templates I create are named in
lower-case, use hyphens instead of spaces, and end in .tpl. For
example, I might call a template two-column-layout.tpl.
Next, enter your template data in the main editor area of the widget. This is where the Smarty-style syntax is used. Refer to the Template Writing Guide for more details.
If required, you can also enter a template description. This may be a useful instruction to other people who update the templates in your site (or useful to yourself in the future when you've forgotten the reason for a template!).
Once you are done editing the template, click the button to save your changes. The widget will remain open so you can make further changes if required. Alternatively, click to save your changes and close the widget.
When you attempt to save your template, Recite CMS will validate your template to ensure there are no syntactical errors. You will be prompted if there are any mistakes found.
If you have made changes to a template and not yet saved them, the template editing area will have a red border and red-tinted background colour. This is simply to remind you to save.
Most of the template types in Recite CMS have sample templates associated with them that you can use as a basis for creating your template. They are generally not overly advanced in their layout or display, but should be sufficient in demonstrating how the data should be used.
If a template type has samples available, a drop-down will appear between the Description field and the template editing area. Select a sample from the drop-down and click .
Loading a sample template will replace the editing area with the sample. If you don't want to save the changes, simply close the widget (you may be prompted to confirm that you want to discard the changes).
Each template type has different data associated with it, since the different templates of each type are used in different areas of your site.
For a list of the data that can be used in your template, click the link beside the template type label.
This will open the template documentation widget, listing all of the data for that template type.
It might not be clear initially how to use this data, but if you compare the documentation with a sample template (as well as reading Template Writing Guide) it should become clearer.
To edit a template, click the link beside the name of the template in the template browser. This will open the template in the Template Editor widget. At this point, you can edit and save your template just as you would when creating a new template.
If you have made changes to a template and not yet saved them, the template editing area will have a red border and red-tinted background colour. This is simply to remind you to save.
If you accidentally create a template using the wrong template type, you can change this by clicking on the button when viewing the template.
You will then be prompted to select a new type. Select the type you want to change the template to, then click the button.
You can make the template editing area bigger or smaller by dragging it up or down from the bottom of the area.
Your size preference will be saved for that particular widget.
To delete a template, click the link beside the relevant template in the template browser.
Before you can delete a template you must confirm that you want to delete it. A confirmation dialog will appear, listing the places where the template is currently being used. This is to make you aware that deleting the template may affect the correct display of your web site.
This list of places where the template is being used may not be exhaustive.
Click to delete the template.
Recite CMS allows you to duplicate an existing template. To do so, load the template in the template editor widget and click the button. You will be prompted to confirm this action.
The newly-created template will reside in the same folder as the original template. It
will share the same template name, as well as being prefix with Copy of.
The template will be duplicated from its last save point. In other words, if you make changes to the original template then duplicate it before saving the changes, those changes will not be included in the copy.
You can move a template to a different folder by dragging the template by the drag handle. You will need to drop it onto a folder in the Template Manager Tree View.
You can move multiple templates at once by checking all of the templates you want to move, then dragging them all using the drag handle of one of the selected templates.
If you have access to the Recite CMS versioning module, you can easily revert back to an old version of a template. This is useful if you make changes to a template that you want to undo.
To view old versions of any template, click the button while viewing the template. You will then be shown a dialog which lists all of the different versions that are saved.
The current version will be selected by default, but you can select an older version from the list to see the differences. If you want to restore that older version, click the button. The older version will now be restored.
When an older template is restored, it is saved as yet another revision of the template. This means you can revert back to the version you just switched from.